How to Convert JPG to PDF with Adobe Acrobat
How to Convert JPG to PDF with Adobe Acrobat - Now, there is a lot of website converters where we can change the PDF format to JPG and vice versa like ilovepdf pdf to jpg, then there are pdf.io and others. Websites such as jpg pdf converter are actually quite helpful indeed for users who do not want to complicated to change or convert files using the application. However, what if at the time we want to change the image to pdf there is no internet on the device we use? Well, here the role of software or PDF converter application is needed. Maybe many of you do not know that Adobe Acrobat software has the feature to convert photos into PDFs. In this article, we will discuss how to convert JPG files into PDFs with Adobe Acrobat. Here I use Adobe Acrobat Pro XI software as an example medium. However, don't worry about other versions of Adobe Acrobat Pro also have similar functions and almost the same look.
 |
| How to Convert JPG to PDF with Adobe Acrobat |
How to Convert JPG to PDF with Adobe Acrobat
1. Open Adobe Acrobat
The first thing you need to do to convert JPG to PDF is to open Adobe Acrobat.
2. Convert JPG to PDF
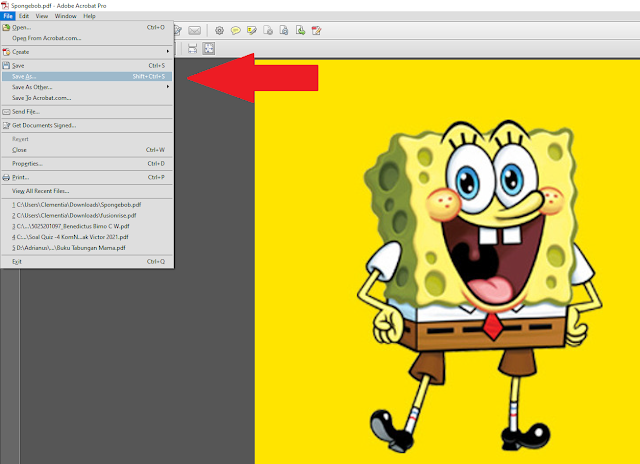
Then change the JPG file to PDF by clicking the Create button at the top left, and then select PDF from File. Then select the JPG image file that you want to change to PDF. Jpg image files will appear on the Adobe Acrobat work screen. Now you just save this image as a PDF by clicking File in the top left corner of the screen, then select Save As, select the PDF type file, and name and save the PDF file where you want. Now the JPG image file has become a PDF file.
 |
| Create PDF from File |
 |
| Save As as PDF File |
That's the short tutorial on How to Convert JPG to PDF with Adobe Acrobat. Thank you for reading this one. I hope it can be useful for you guys.


